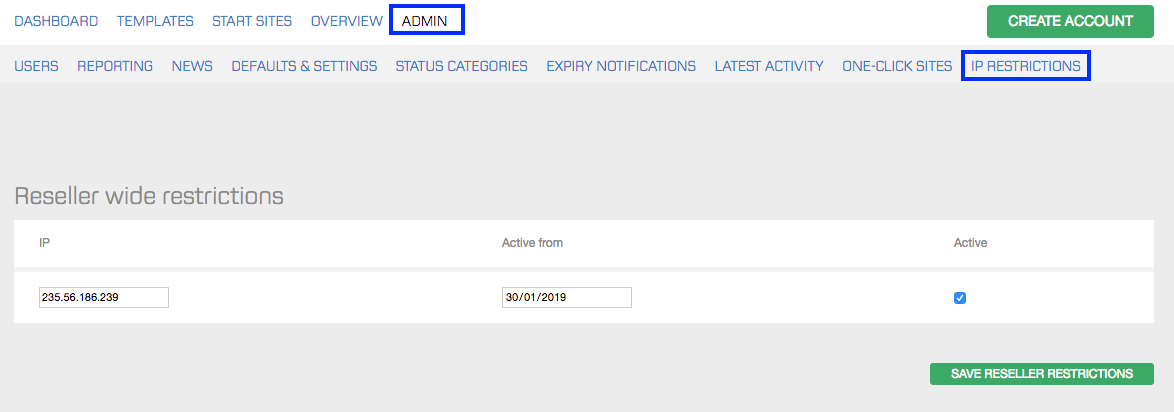
By setting up IP restrictions, you have full control over which IP addresses are allowed to log in to your RAI account. Whitelisted IP addresses apply either for all the users or your account, or you can whitelist specific IPs for each individual user.
IP restrictions add an extra layer of security to your account management. While you can always delete users, for example if they no longer work for you, a whitelisted IP ensures that a user cannot successfully log into your RAI account unless they do so from the IP address specified by you, the account admin. This feature also prevents account users from logging in from public computers, which would otherwise pose a security risk for you and your clients.
What does whitelisting mean?
When you whitelist an IP address, it means that you allow users to log in to RAI only from that specific IP. They won’t be able to log in from any other IP address. This is opposed to blacklisting, where users would not be able to log in from an IP that you have specified. The IP restrictions feature in RAI is based on IP whitelisting.
Whitelisting IP addresses for all users
If you wish to whitelist an IP address across your entire user group in RAI, add the relevant address in the IP field. Select from which date the change should come into effect (the input format is dd/mm/yyyy). Tick the Active box to indicate that this whitelisting is in effect.
Example: starting January 30, 2019, you only want your colleagues to be able to log into RAI when they are accessing it from your office. You don’t want them to be able to log in from other locations, for example their home, the local library, and so on. Your office IP address is 235.56.186.239. Fill in the fields as indicated below and click the Save Reseller Restrictions button.

If you wish to lift the restriction later on, untick Active and click the Save Reseller Restrictions button.
IPv4 and subnet masking
In the IP field you can add either an IPv4 address (written in the dot-decimal notation, e.g. 192.0.2.235) or a subnet mask.
Whitelisting IP addresses for individual users
If you wish to whitelist an IP address for a specific RAI user, add the relevant address in the IP field next to the user's name. Select from which date the change should come into effect (the input format is dd/mm/yyyy). Tick the Active box to indicate that this whitelisting is in effect.
Example: starting January 30, 2019, you only want your external fulfilment agent, Anna, to be able to log in to RAI from her home office. You don’t want her to be able to log in from other locations. Her home IP address is 265.96.243.266.
Fill in the fields as indicated below and click the Save button.

Whitelisting multiple IP addresses
It’s possible to whitelist multiple IP address for your organization or individual users. After you've added one IP address and saved it, a new field will appear and you can whitelist a second IP address. Continue this process until you have whitelisted all the relevant IP addresses.

If a non-whitelisted user attempts to log in
In case a user tries to log into RAI from an IP address that has not been whitelisted, they will get the following error prompt: “Warning! Login failed. Please try again.”
